


Article
Poultry Raising Guide
Giving the smallest members of your flock a great start.
If you’re raising poultry on your farm, start here! This easy to follow guide will help you give your birds a great start.
Getting Started
- Starter housing
- Feeder
- Waterer
- Bedding
- Heat lamp
- Thermometer
- CHATTERBOX or Ritchie-Smith Poultry Feed
- Shallow water dish (waterfowl only)
- Fencing
- Prepared coop
Take Attendance
Who are you bringing home? If you’re raising multiple species, we recommend separate housing; both for bird comfort and safety. It’s important each species has free access to the correct feed and environment. Differences in bird sizes can lead to injuries of smaller birds, and chicks don’t mix well with the open water you’ll need to provide ducklings and goslings.
Starter Housing
Assuming you’re raising poultry without a bird mama, the responsibility of keeping the birds safe and warm will fall solely on you. There is a wide variety of enclosures to choose from including small cages, aquariums, and troughs. Select something sturdy and free of tight spaces. Non-porous surfaces are most efficient for sanitizing, and solid floors provide them stable footing and keep bedding material contained.
Safe Handling
Birds are sweet and social animals and can grow up to be fantastic additions to your farm…and family! Just remember; these little ones are very fragile so please don’t ever allow young children to handle them unattended. Be sure that in between the gentle snuggles they’re bound to receive, they’re given adequate time in their enclosure to eat, drink and sleep.
Keeping Birds Warm
Use a heat lamp to provide light and warmth. Consistent light will encourage them to eat and drink enough for proper growth. Keep a thermometer mounted to your housing so you know the temperature is regulating properly. For week one keep temperature around 32 degrees Celsius with good airflow, then gradually decrease. For additional details refer to “Lighting & Temperature Plan for Raising Poultry” section below.
Lighting Plan
Provide bright supplemental lighting for 20 hours/day for the first week to encourage proper feed and water intake, then gradually drop light time along with temperature. For a full example plan refer to “Lighting & Temperature Plan for Raising Poultry” section below.
Cleanliness is Key
Clean the housing both thoroughly and often. With your birds removed, wipe enclosure and accessories down with a mild bleach solution and allow to dry completely before adding fresh bedding, feed, and water. Remember to keep the birds in a warm safe spot while their house is being cleaned.
Feed
Select one of our quality feeds, based on age and species using the charts below. Allow free choice feeding, as birds will regulate their own consumption. Choosing a feeder that has head holes or dividers can help reduce waste and mess, but the most important piece at this young age is ensuring the birds can find and access the feed easily.
Feeding quail? Use our 25% Pre-Starter A Crumble from hatch onwards. They’ll love the manageable crumble size and the high protein content.
Click here to explore Chatterbox, our line of premium poultry feed made with NON-genetically engineered grains from the Canadian prairies.
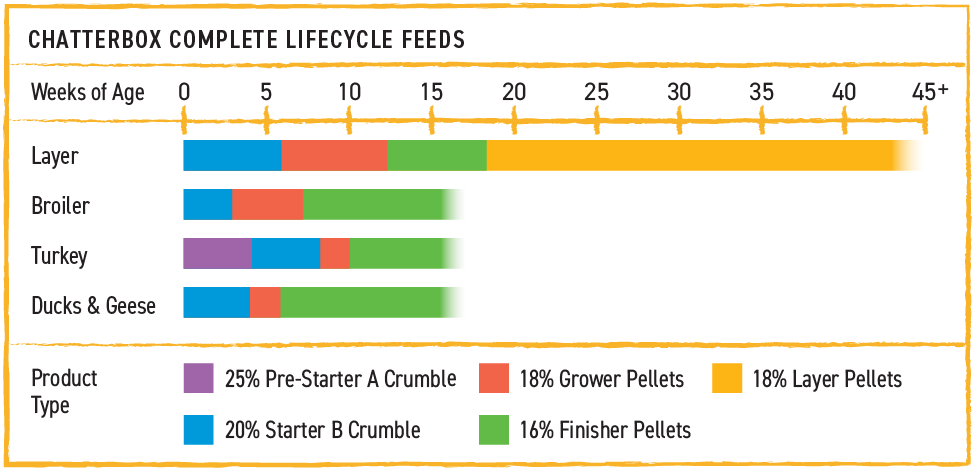
Click here to explore other Ritchie-Smith poultry feed options including both medicated and non-medicated products.
Water
Water is a crucial, and often overlooked nutrient. To start, provide a small water dispenser that is easy to clean and not easily tipped. Always keep the water clean and fresh. We will cover more water options below in our coop set up section.

Ducklings & Goslings
If your new babies include any waterfowl, it will be especially important to keep the feed and water close together. These species need to drink as they eat, to minimize risk of choking.
Avoid water bottles and opt for a shallow dish. Ensure the water is deep enough for them to submerge their bill to clean their nostrils.
When it comes to swimming, ducklings and goslings would normally acquire oils from their mother’s feathers that would allow them to swim. If hand raising them, start with a small dish they can easily get in and out of on their own, keeping the water shallow enough for them to stand in. The dish should be near their heat lamp so they can rewarm quickly after their time in the water. As their feathers come in, they will develop their own oils that allow them to swim safely. Have patience before introducing deeper pools and then monitor them closely until they’ve proven their swimming ability.
Building a Coop
Start planning and setting up your coop before you bring your the babies home, because these birds will grow fast! Find the approach that works best for your farm. Check out what others in your climate have tried for inspiration and to learn from hurdles they’ve already tackled.
- Convert a shed
- Section off part of a barn
- Buy a ready-to-build kit
- Build your own from scratch
If you’re building your own, consider an elevated coop. This minimizes the temptation for unwanted guests to make their home underneath and provides birds a shelter from rain and sun when they’re outside. Coops can also be build onto utility trailers which allows them to be moved as needed. This can be especially helpful for those living in areas prone to wildfires or flooding.
Cleaning Your Coop
Cover the entire floor with a generous layer of bedding. This will prevent excess mess from sticking to the coop floor, which will make clean out day far simpler. Traditional bedding should be replaced weekly. Thicker layers of bedding can extend this time but should never sit for longer than a month. Coop clean out day is a great opportunity to give each of your birds a health check and address any injuries or concerns.
At least twice a year, as well as following any outbreak of disease in your flock, the coop should be completely sanitized including all surfaces and accessories.

Coop Accessories
Be sure to include ~1″ diameter perches at various heights in the coop to give all your birds a spot to sleep comfortably. This can be done with branches, dowls, or pipes.
Equip the coop with a latching door to help with safety; you can even install high-tech automatic coop door systems like these options from Chicken Guard.
For layer hens, aim to have at least 1 nesting box for every 4 hens. Line each box generously with bedding and keep clean between full coop cleanings.
Elevate feed to help to reduce waste and contamination. Feeders with head holes or dividers can reduce mess and waste caused by the birds swinging their heads in the feeder.
For chicken and turkey waterers, consider the nipple style dispensers to keep the water clean and the floor of your coop drier. Water lines can also be utilized if you have a water supply plumbed to your coop.
Temperature
Once your birds are grown, they can handle fluctuations in temperature to a certain degree (pun intended). They can survive in temperatures of approximately 10-35 degrees Celsius, but the optimal range to see them thrive is 18-25 degrees Celsius.
In summer heatwaves, do not trap birds in a coop if the inside temperature cannot be regulated. You can try various cooling methods including indoor fans and sprinklers on the roof to bring down coop temperature. You can also create outdoor misting stations by securing these sprinklers to your fence as a way for your flock to cool down. In winter, the use of heaters may be necessary to keep your birds comfortable.
Humidity
Humidity will also affect your birds, with the optimal range being between 50% and 70%. If the thermometer is only showing 30 degrees, but it “feels like” 35 degrees with humidity, then you’re already heading into dangerous conditions for your flock. During periods of higher humidity refer to humidex for accurate temperature calculation.
Lighting & Temperature Plan for Raising Poultry
The following example plans will help to prepare a layer hen to reach the higher end of the production range for her breed. If you add your birds to a free range coop and outdoor run with natural daylight hours and temperatures before 18 weeks she will still lay when ready, but likely won’t reach the same level of production.
Example Supplemental Lighting Plan: Layer Hen
Supplemental lighting provided by standard dimmable light bulbs.
Keep heat lamp on continuously if it is the primary source of your warmth.
- Days 1-7: 20 hrs/day on full brightness
- Days 8-14: 16 hrs/day on moderate brightness
- Days 15-21: 12 hrs/day on moderate brightness
- Days 22-28: 10 hrs/day on moderate brightness
- WEEKS 14-18: 9 hrs/day on dim brightness
(When lay begins, gradually increase light duration and brightness over a period of 7 days to reach below target) - Lay onwards: 16 hrs/day on full brightness
Example Temperature Plan: Layer Hen
All temperatures displayed are in degrees Celsius.
- Days 1-7: 31-36 degrees
- Days 8-21: 26-29 degrees
- Days 22-28: 20-25 degrees
- Days 29 onwards: 18-25 degrees
Airflow
Fresh air is important no matter the temperature outside, as a sealed coop can cause a build-up of ammonia, which can damage their eyes and airways in as little as 10 minutes at higher concentrations. For example; at 50 ppm (where a human will start to tear up) your flock will begin developing corneal ulcers. Concentrations as low as 25 ppm can cause respiratory diseases. Ensure your coop has a continuous supply of fresh air and keep ammonia at a minimum by cleaning your coop regularly. If you’re concerned about ammonia, keep a testing kit on hand to check levels periodically. If the use of a fan is required, be sure to use the fan to exhaust the coop air to the outside, which in turn will draw in fresh air for your flock. The intake vent should be smaller than the output vent to regulate airflow effectively.
Lighting
When days shorten in winter months, birds may enter a moulting period and will slow or stop laying entirely. You can reduce the effects of this by providing proper periods of both light and darkness each day with artificial lighting in your coop and run. Aim to provide a minimum of 15 hours of light per day once your birds are laying. Use of a light timer can be a helpful addition to your coop to ensure their needs are met.
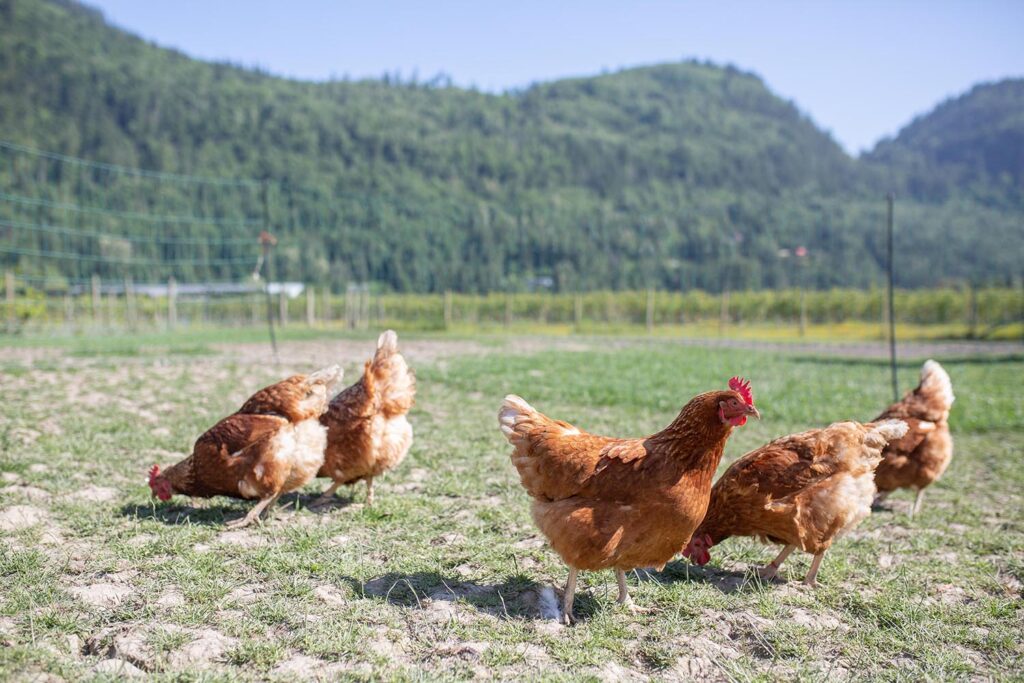
Setting Up Your Run
Some people choose to let their birds free roam, but if this is your preference be prepared to find eggs laid in the most interesting of spots. That is, if you can find them at all! Free roaming hens will spend the night in trees, hay lofts, under porches, etc. But this will leave them vulnerable to predators and greatly reduce your chance of a reliable egg supply.
Permanent Fencing
Providing a properly fenced area will reduce the loss of flock members to predators or wandering away. If you have an open top run, be sure the sides are at least 6′ high to contain your flock. While chickens can’t fly in the traditional sense they can flutter easily over a shorter fence. Chicken wire as well as the small-hole welded fencing are both great options to consider. Start the fence base a few inches into the ground to help protect from unwanted visitors digging in. Small shrubs can be added as natural outdoor shade and perches but watch they don’t provide a way for the birds to flutter out over the fence. Chickens are great diggers and will make holes around the run for dust baths, so make sure their digging doesn’t create a way in (or out) along the fence line.
Portable Fencing
There are also temporary fencing options to use without low voltage electric lines to deter predators. While you should expect to have some rogue birds outside the run most of the time, it’s a great option if you plan to move the coop and run around your property to maintain grass health. As you can imagine, this approach provides no protection from overhead predators like eagles.
Waterfowl will also need a decent sized pool that is deep enough to swim and preen. These birds will make a mess quickly, so be prepared for the commitment of keeping their pool water clean and have a plan ready to keep it thawed in the winter months.
Pests
Always seal your feed in a rodent proof container. When raising poultry there is a long list of pests that would love to raid your feed supply, which leads to contamination and possible disease exposure for your flock. If you are struggling with rodents around your coop, visit your local farm store to discuss appropriate control methods. Never use traps or poisons anywhere accessible to your flock.
Predators
Lock your entire flock up in the coop at night whenever possible. Remember that animals like foxes can find their way in through even the smallest of holes, so conduct regular coop checks and repair weak spots right away. Narrower runs or overhead fencing may stop birds of prey, but some predators won’t be stopped by fencing alone.
Larger breeds of dogs can be left on guard to scare off would-be predators but if you’re not a dog person, you could always get yourself a donkey – because who doesn’t want a donkey?

Have a Specific Question?
Our dedicated team of expert nutritionists are here to help. Send us your questions.
Ask Our Experts